Fix CompareExchange128 Windows 10 Error [Solved]
If you have an older processor and motherboard, and you are thinking of upgrading to Windows 10 64-bit Operating System then you might face CompareExchange128 error, and you will not be able to install the Windows 10 64-bit OS on your PC or laptop. This problem also occurs with the users who are upgrading to Windows 8.1 from Windows 8.
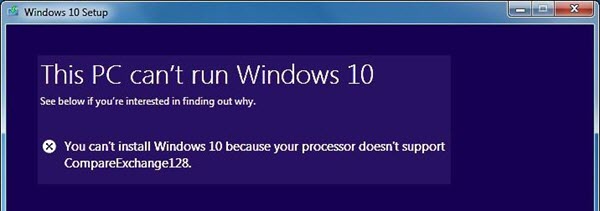
The Error will read as “You can’t install Windows 10 because your processor doesn’t support CompareExchange128”.
What causes CompareExchange128 error in Windows 10?
The main cause of CompareExchange128 error depends on the various two conditions:
CPU lacks CMPXCHG16b Instruction – This is the foremost reason for CompareExchange128 error which occurs because your CPU or Processor lacks CMPXCHG16b Instruction which is needed for Windows 10 64-bit Installation.
Old & Outdated BIOS – The CompareExchange128 error can also occur even if your 64-bit CPU / Processor supports CMPXCHG16b Instruction. This is due to older version of BIOS on your motherboard which fails to detect some of the instructions in your CPU or Processor which in this case is CMPXCHG16b.
Must Read: When to change Motherboard BIOS Battery?
How to find out whether your CPU supports CMPXCHG16b Instruction?
Here are the various methods by which you can find out if your processor supports CMPXCHG16b Instruction or not.
Using CPU Info Tools
CPU-Z – CPU-Z is a widely popular and well known CPU info tool that can tell you the complete details of your current CPU / Processor, Motherboard details and memory details. It is a very tiny utility and you can download and install it from the link given below.
Coreinfo – Coreinfo is small command line utility that can tell you about the various in-depth technical details about your CPU or Processor. It can tell you about the mapping between logical processors and the physical processor, NUMA node, and socket on which they reside, as well as the cache’s assigned to each logical processor. It really gives you the very technical details about your processor which can be very hard to understand for most of the users but here you have to focus on only one thing which is CMPXCHG16b Instruction.
Click here to Download Coreinfo & Learn How to use it?
Search on Internet
If you do not physically own the processor but want to know that whether the other processor supports CMPXCHG16b Instruction or not, then you can find this by searching online on the internet. You can type the following search query in the Google for this:
<CPU Model> CMPXCHG16b
Fix & Solutions for CompareExchange128 / CMPXCHG16b Error in Windows 10
Here are the various fix and top solutions for resolving CompareExchange128 / CMPXCHG16b error on your computer when installing 64-bit version of Windows 10.
Update BIOS
The first thing to do when you encounter this CompareExchange128 / CMPXCHG16b Error is to update or flash your BIOS to the latest one. For this download the latest copy of BIOS (.ROM file) from your motherboard’s manufacturer website and then follow the instructions given in your motherboard manual to update/flash the BIOS. In most of the cases updating the BIOS can fix this annoying error.
Install 32-bit version of Windows 10
If updating the BIOS doesn’t solve your problem then forget about installing 64-bit version of Windows 10 and install the 32-bit version of Windows 10 until you decide to upgrade your processor and motherboard.
Workaround Fix [credit:windowsreport.com]
This is a workaround and not a proper fix but some users have pretty good success with it.
1. Backup all your important data and files.
2. Download all the updates and upgrade to 32-bit version of Windows 10.
3. Your Windows 10 32-bit version copy will be activated on Microsoft servers.
4. Now Download 64-bit version of Windows 10.
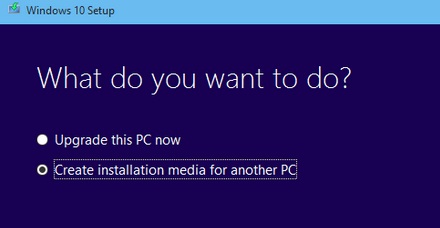
5. Use Windows 10 Creation Media Program and choose Create installation media for another PC. You will need an empty DVD or USB Flash Drive for this.
6. After this perform a clean install of Windows 10 and skip the step where it asks you to enter the serial number.
7. After the Installation is complete you will have Windows 10 64-bit running on your PC which is fully activated.
Get a New Processor & Motherboard
If all of the above solutions fail then the last resort is to upgrade your PC and get yourself latest generation of Processor and Motherboard which is fully compatible with Windows 10 64-bit OS.
If you have some queries regarding this then you can ask me by leaving a comment below.
See Also:
- Solution to USB Device Not Recognized Error in Windows
- How to Fix DNS_PROBE_FINISHED_NXDOMAIN Error in Chrome
About Author
Akshat Verma
A Professional Blogger, Web Developer, Hardware Enthusiast, Gamer, Geek and Founder of many other websites. He holds M.Tech degree in IT and B.E degree in Computer Science & Engineering.
I have 4 PCs with the same hardware, and have been able to install Windows 10 Pro 64 bit on all of them – but one – the latest one I am attempting to upgrade has Win 7 Pro 64 and will not install Win 10. So from my thought this is something new to the Windows 10 experience.
Try clean install of Windows 10 Pro 64-bit on your latest PC.
It won’t get to the point where I can do a clean install before
I get the warning.
Can you please tell me at which point exactly you are getting this warning?
Only slightly related, but I built out a Dell Vostro 410 with a Xeon Processor instead of the stock Core 2 Quad. Had this same issue in updating to Win 10, and later found that the Xeon instruction set doesn’t support CompareExchange128, but the engineers thought that it would reset and be a non-critical problem. I solved it by replacing the original processor, then updating, then reinstalling the Xeon, which has run just fine since (albeit about 33% faster).
I’m only putting this out there because I read a lot of other people’s solutions to the issue before just cutting to the chase and successfully trying this. I suspect that there are other old-school upgraders out there who might find it useful to know.
MY Processor is INTEL PENTIUM Dual Core E5200. Windows10 x64 and windows 8.1 x64 is not installing error like CompareExchange128 while installing on the pc. when bootable my pendrive and installing win 10 logo is stuck and not opening anything error like 0x0000001 in the Recovery what can I do pls tell how to install win 10 or win8 in my pc?
Please follow all the solutions given in the post.
Hi
Hello. Which version of Windows is more suitable for the game, please help me
Thanks
Windows 10 Home is good enough for modern games.